How to authenticate rest apis with Laravel Passport?
Hello Artisans.
I'm going to show you how to authenticate rest apis with Laravel Passport? This detailed tutorial gives you a complete step-by-step guide to creating authentication apis with Laravel Passport.
What is Laravel Passport?
It's a laravel package. Laravel Passport uses an OAuth2 server to perform api authentication. It creates tokens for api authentication and protection. The api request is granted if the tokens are validated.
So let's get started creating the rest apis with authentication.
Step 1: Install new Laravel Application
First of all, you have to install a new setup of the laravel application. Just run the following command in your terminal. You can skip this step if you wanna use your existing project.
composer create-project laravel/laravel LaravelAuthApisor use global command to install new laravel application
laravel new LaravelAuthApisIf you wanna check a newly created Laravel project just run the below command:
php artisan serveYour project will run on 8000 port. Open your browser and enter the following url:
http://127.0.0.1:8000
Step 2: Configure Database
Configure your database credentials in your .env file.
DB_CONNECTION=mysql
DB_HOST=127.0.0.1
DB_PORT=3306
DB_DATABASE=database_name
DB_USERNAME=database_username
DB_PASSWORD=database_password
Step 3: Install and configure the Laravel Passport
Laravel passport generates a unique token for every authenticated user, so every request will be validated with that token for the protected routes. Let's install the passport package by the following composer command.
composer require laravel/passportOur users will need to register and login to access our protected routes in our application. Don't worry about it. Laravel application comes with a default user model and user migration file. This will be enough to get users to register and login.
You will need to add HasApiTokens trait in user model. just like the following code.
<?php

namespace App\Models;
use Illuminate\Database\Eloquent\Factories\HasFactory;
use Illuminate\Notifications\Notifiable;

use Laravel\Passport\HasApiTokens;  //add the namespace

class User extends Authenticatable
{
    use HasApiTokens, HasFactory, Notifiable;   //use it here
}
In Laravel Application, Policies are used to protect the application from unauthorized users. When some of our routes need to be protected then the access tokens will be required to access the application, you have to make the Policies. So, you have to uncomment the code from the following file.
app\Providers\AuthServiceProvider.php
<?php

namespace App\Providers;

// use Illuminate\Support\Facades\Gate;
use Illuminate\Foundation\Support\Providers\AuthServiceProvider as ServiceProvider;

class AuthServiceProvider extends ServiceProvider
{
    /**
     * The model to policy mappings for the application.
     *
     * @var array<class-string, class-string>
     */
    protected $policies = [
        'App\Models\Model' => 'App\Policies\ModelPolicy', // uncomment this line
    ];

    /**
     * Register any authentication / authorization services.
     *
     * @return void
     */
    public function boot()
    {
        $this->registerPolicies();

        //
    }
}
Now you have to add Passport's TokenGaurd to authenticate incoming API requests. To add this, update your config/auth.php file, just go to the guards and add the following code.
'guards' => [
    'web' => [
        'driver' => 'session',
        'provider' => 'users',
    ],


	//add this code
    'api' => [
        'driver' => 'passport',
        'provider' => 'users',
    ],
],
Laravel passport creates some database tables for OAuth tokens and authentication, so you have to run the following two commands to migrate the database and generate the encryption keys for your application.
php artisan migrate

php artisan passport:keys

php artisan passport:client --personal
Step 4: Create User Auth Controller
Now, we will create a controller which will enable users to be able to register and login in our application. Use the following command to create the UserAuthController in the Auth folder.
php artisan make:controller Auth/UserAuthControllerYou will get the newly create controller in app\Http\Controller\Auth directory. So, let's create the register and login methods we need:
<?php

namespace App\Http\Controllers\Auth;

use App\Http\Controllers\Controller;
use App\Models\User;
use Illuminate\Http\Request;
use Illuminate\Support\Facades\Validator;

class UserAuthController extends Controller
{
    public function register(Request $request)
    {
        $validator = Validator::make($request->all(), [
            'name' => 'required|max:255',
            'email' => 'required|email|unique:users',
            'password' => 'required|confirmed'
        ]);
        if ($validator->fails()) {
            return response()->json(['error'=>$validator->errors()], 401);
        }

        $request['password'] = bcrypt($request->password);

        $user = User::create($request->all());

        $token = $user->createToken('API Token')->accessToken;

        return response()->json([ 'user' => $user, 'token' => $token]);
    }

    public function login(Request $request)
    {
        $validator = Validator::make($request->all(), [
            'email' => 'email|required',
            'password' => 'required'
        ]);
        if ($validator->fails()) {
            return response()->json(['error'=>$validator->errors()], 401);
        }

        if (!auth()->attempt($request->all())) {
            return response(['error_message' => 'Incorrect Details.
            Please try again']);
        }

        $token = auth()->user()->createToken('API Token')->accessToken;

        return response(['user' => auth()->user(), 'token' => $token]);

    }
}
Now we have the register and login methods. Let's create routes for these methods. You have to define routes in routes/api.php file.
Route::post('/register', 'Auth\UserAuthController@register');
Route::post('/login', 'Auth\UserAuthController@login');
We have created the routes also, now our users can easily register and login in our application. Now user can access your protected resources by getting registered in your application.
Testing Authtentication APIs
Let's do a quick testing of our newly created authentication apis.
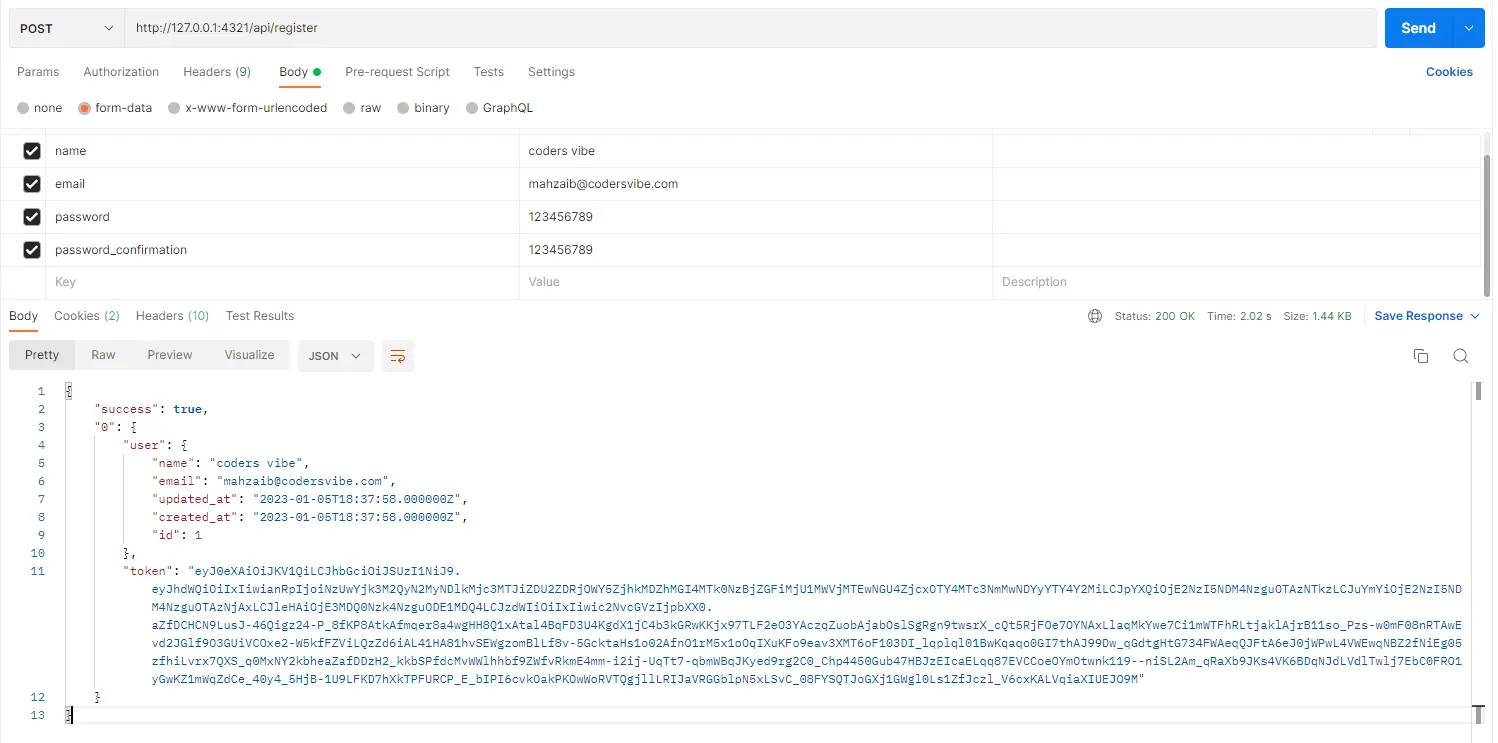
Register
url: http://127.0.0.1:8000/api/register
method: POST
data: {name: “Coders Vibe”, email: “[email protected]”, password:"123456789", password_confirmation:"123456789"}

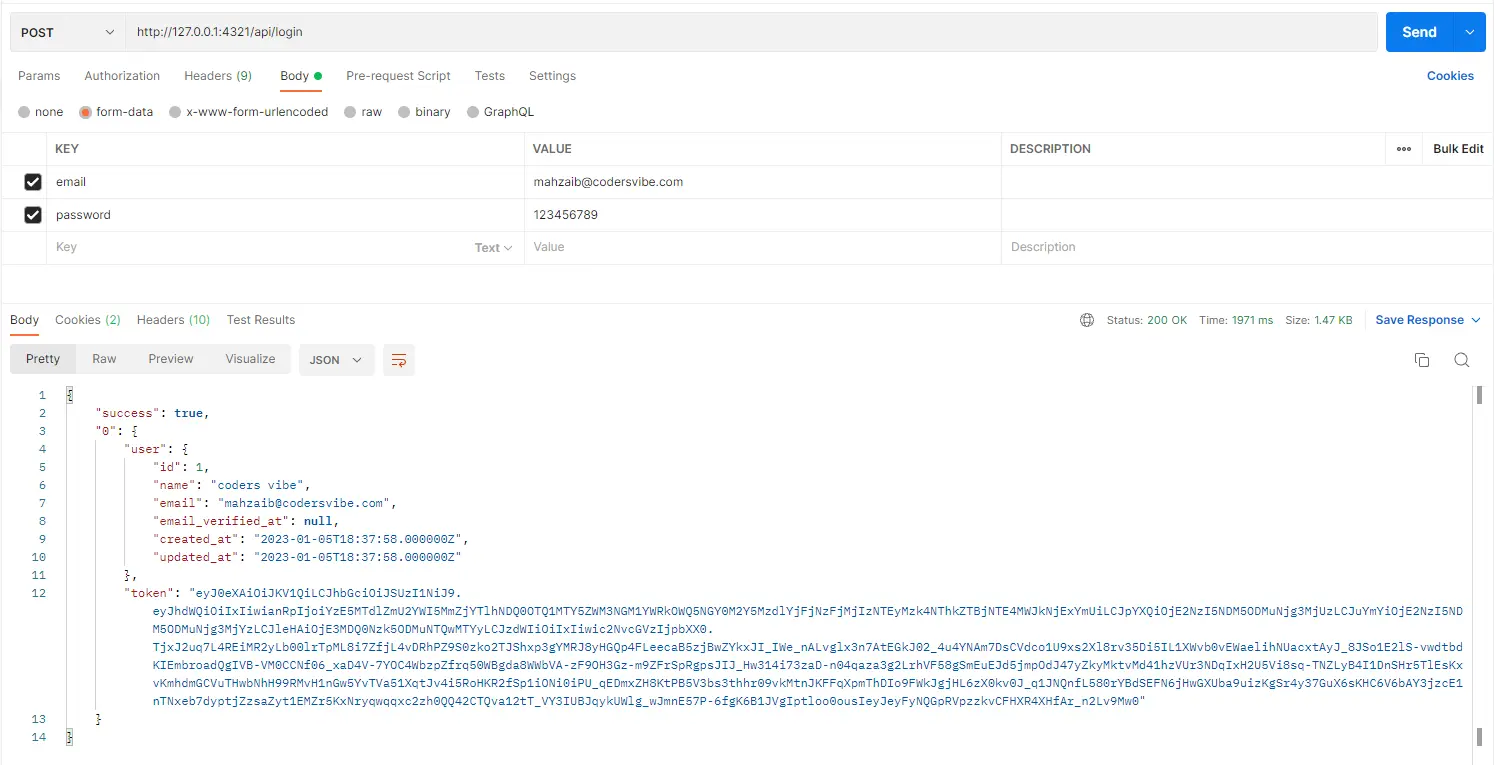
Login
url: http://127.0.0.1:8000/api/login
method: POST
data: {email: “[email protected]”, password:"123456789"}

As you can see in the api response, every registration and login request will return an authentication token. You have to pass this token in to the header to access any protected resource from your application.
Conclusion
In this tutorial we have learned how to authenticate rest apis with laravel passport. At the end of this tutorial, you can create authentication apis for your laravel application with laravel passport package. Now you can authenticate users for these restful apis also that we have created in another tutorial.
I hope it will be helpful, If you foud this tutorial helpful, share it will your fellows.
Happy Coding :)


